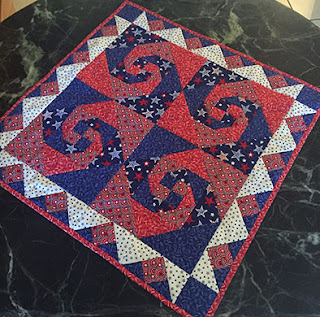
Fantastic Fireworks
30” x 30”
Designed by Heidi
Pridemore
This month I used my GO! Qube Mix & Match 6” Block Set, and the GO! Big Snails Trail 12” finish die to create a
Table Topper for the 4th of July. I kept the project small so even
the busiest of sewers can whip this up in time for the holiday!
Growing up in Rochester,
NY, the 4th of July was the start of picnic season especially since
sometimes it does not warm up until the end of June! We would be outside for
the whole day and at the end of the day we would watch fireworks from our front
yard. But since I moved to Phoenix 20 years ago, now the 4th of July
means something entirely different. It means triple digit heat and the start of
our cabin fever. It is way too hot to have a picnic outside so we tend to stay
in the air-conditioned house for our party. I designed “Fantastic Fireworks” so
I can remember my childhood 4th of July celebrations while enjoying
my indoor picnic in Arizona.
 The pattern for this
month’s project “Fantastic Fireworks” is free from The Whimsical Workshop. You
can download the free pattern at www.TheWhimsicalWorkshop.com along with our past free patterns. We have also included
traditional cutting instructions for this project in the pattern too. Also I
was able to made up a few fabric kits for this project using the same fabrics
as shown here. These are available on our website at www.TheWhimsicalWorkshop.com. Make sure get one before they are all gone.
This month I am sharing
some photos of how crazy easy it is to make Snails Trail blocks with the
AccuQuilt Cutter and Go! Big Snails Trail die and also how to work with the
directional prints in the border. As always, make sure to refer to the pattern
for the complete instructions since this is just an overview of the project.
Snails Trail has been one
of my favorite blocks forever. So when I had the opportunity to use the Snails
Trail die along with my Go! Qube 6” finished set, I jumped at the chance. I thought
this block was perfect representation of fireworks, so I designed the topper
with this in mind. The way the die is designed is that you only need two
rectangles of fabric to get all the pieces for one block. For my project, I
decided to use four fabrics in each block which means I am cutting enough
pieces to make two blocks from four rectangles. In the past when I have cut the
pieces for a Snails Trail, it took about 30 minutes for something this small.
Using the Go! Electric cutter and the Go! Big Snails Trail Die, it took under 2
minutes to cut all the pieces you see above. Amazing!! I am in love!!!!
 Once all the pieces are
cut, time to move on to the piecing. It is important to note that anytime you
are working with triangles, you have bias edges that like to stretch. So you
need to be gentle with them and not overwork them. Another great part of die
cutting the shapes for this block is each piece is cut exactly to size and the
corners are angled. This means you do not need to trim the excess fabric at
each corner (dog ears) and you can use this angled edge as a guide to line up
the pieces as you go. When using four fabrics you will end up with two
different block layouts and that works perfect for this project.
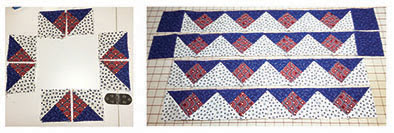
  Now on to the pieced
border! In this border I used one fabric that happened to be directional. I did
not worry about the direction of this print in the Snails Trail blocks, since I
love the movement the pattern was creating. But for the borders, I did want to
control the placement of this fabric. I used the Die #4 from the GO! Qube 6” set,
to cut the triangles from the directional fabric. This makes one triangle in
each direction from each square as shown above.
Now for the tricky part,
making sure to create the correct number of each unit needed for the pieced
border. To do this, first I lay out the pieces into piles for each unit. Then I
sew each unit in the pile together before moving to the next pile. This
hopefully will keep me from making a mistake in regard to the fabric direction.
One I have all the piles
sewn together, I sew the units together to create the borders. Now my borders
are ready to sew the quilt top. Make sure to pay attention of the fabric
direction when sewing the borders to the quilt top.
Now I am ready for the 4th
of July as well as Memorial Day, Armed Forces Day and Veteran’s Day. You can
also make more blocks to create throw or bed size quilt for your favorite
Solider. I hope you enjoy this project. These little toppers are like potato
chips and you can’t just make one. This pattern will work with any style of
fabric. As always I would love to see what you come up with. We would love to
add you to our Bragging Rights Page on our website!
Make sure to visit my blog each month where I
will share with you some tips and tricks on cutting and assembling of the
project of the month along with posting the free pattern on our website The
Whimsical Workshop You can also see
our pattern and post at www.accuquilt.com
Until next time…..
Heidi


