Saturday, September 26, 2020

A Spoooooky Halloween Quilt Virtual Trunk Show!


In my mind, it's never too early to decorate for Halloween! 

This week I wanted to share with you some of our favorite Halloween patterns. I've included both some old favorites as well as a few new spooktacularly cute patterns. For all of them, I've included links to purchase them and listed out the fabric collection and manufacturer I used for the sample if still available. 

I hope you enjoy our Halloween Quilt Virtual Trunk show and don't forget to visit us at www.TheWhimsicalWorkshop.com for more fun patterns and notions! 

 2020 Virtual Halloween Trunk Show from The Whimsical Workshop:

Boo and Jack: This is hands down our most popular Halloween pattern to date. These two guys love to spend Halloween Night together Trick or Treating year after year.
Link to purchase pattern
Fabric Collection: A Spooky Good Time from Andover Fabrics
Size: 30" x 34"
Skill Level: Advanced Beginner
Pattern Notes: Pattern includes full-size reversed templates and full-size placement drawings. An appliqué pressing sheet is helpful with assembly. This is not offered as a digital download due to the size of the Templates and Placement Drawing.


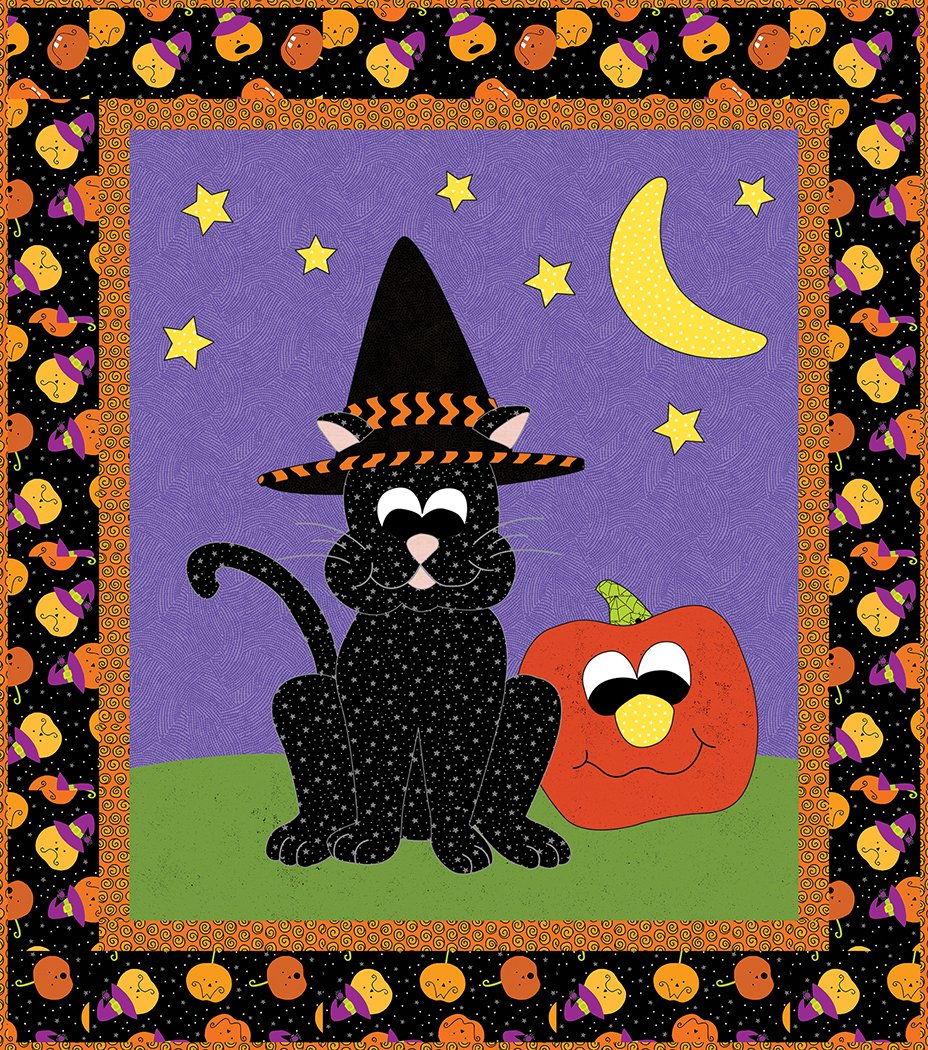
Don’t Forget to Accessorize:  This his and hers pattern is perfect as a beginner pattern to practice you piecing and appliqué. This project is also a fun way to use up scraps! 
Link to purchase pattern

Fabric Collection: Pick Your Poison from Clothworks
Size: 40" x 40"
Skill Level: Advanced Beginner
Pattern Notes: Pieced Pattern with minimal Fusible Appliqué elements.  An appliqué pressing sheet is helpful with assembly. This is not offered as a digital download due to the size of the Templates and Placement Drawing.


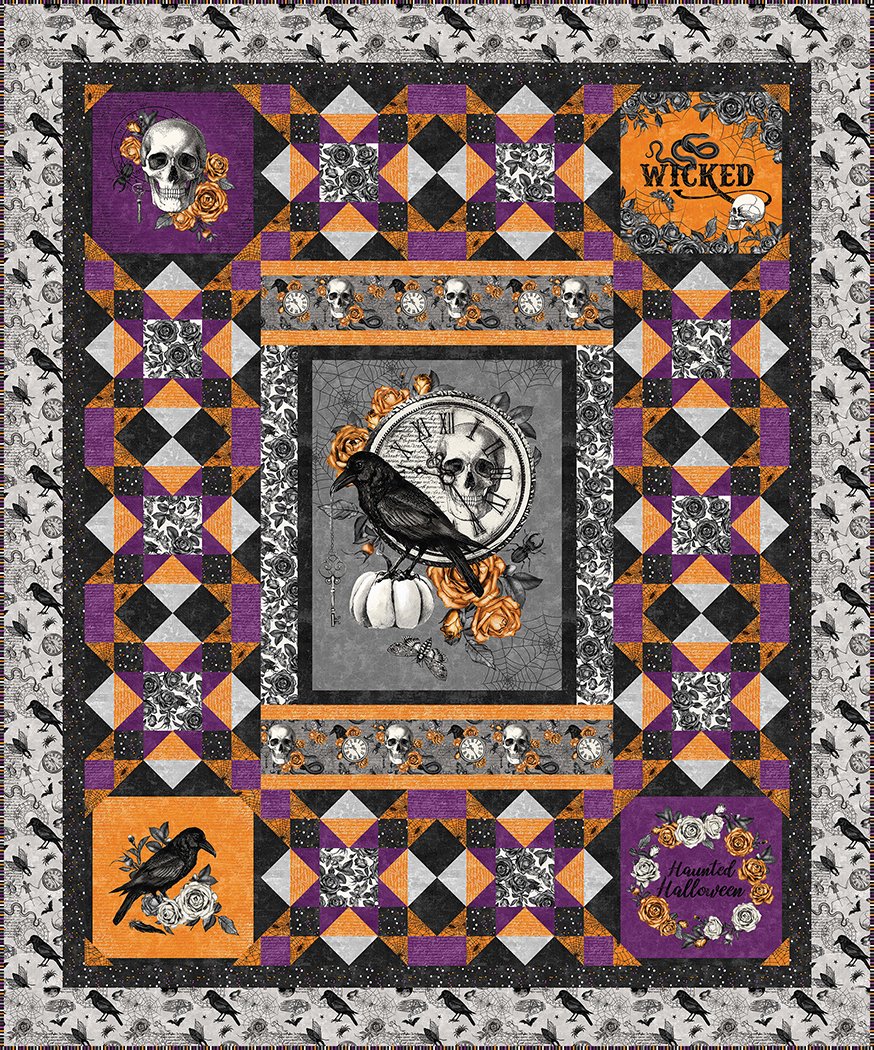
Fright Night: This is a brand new Halloween pattern we're offering this year! I did a Quilt Tutorial for this project that you can watch on YouTube (see below.)
Link to Purchase Pattern
Fabric Collection: Wicked from Northcott Fabrics
Size: 59" x 71"
Skill Level: Advanced Beginner


Ghosts on Post: How about adding some happy Ghosts to your décor this year? This little quilt is perfect to whip up in a flurry right before Halloween.
Link to purchase Pattern
Size: 31" x 36"
Skill Level: Advanced Beginner
Notes: Fusible Appliqué pattern with full-size reversed templates and full-size placement drawings. 
An appliqué pressing sheet is helpful with assembly. This is not offered as a digital download due to the size of the Templates and Placement Drawing.


Mr. Monster Tote: Mr. Monster is the perfect trick or treating assistant as he would love to help hold all of your delicious treats! This tote is a fun and easy project to make and would be a wonderful reusable tote bag, even after halloween; I use my tote year round! We have a video tutorial to walk you through construction available on our YouTube channel.

Link to purchase pattern
Size: 13" x 12" x 4"
Skill Level: Advanced Beginner

Notes: Pieced pattern with fusible appliqué elements. An appliqué pressing sheet is helpful with assembly. 


Spooktacular and Spooky Blooms: This year I'm participating in a Hexi Coffin Swap on Instagram, so I designed two patterns that feature these super cute English paper pieced Coffin blocks. To make your life easier while working on the patterns, I've also created SVG files that you can use on a Cricut to cut out the coffins. 
Spooktacular Pattern 

Spooktacular SVG Files 

Spooktacular Quilt Size: 49" x 68"
Skill Level: Advanced Beginner
Notes: Pieced pattern with English Paper Piecing, machine appliqué and fusible applique

Spooktacular - Link to purchase pattern
Spooktacular - Link to purchase SVG Files

Link to purchase Coffin Papers and Template


Spooky Blooms Quilt Size: 58" x 58"
Skill Level: Advanced Beginner 
Notes: Pieced pattern with English Paper Piecing and machine appliqué.


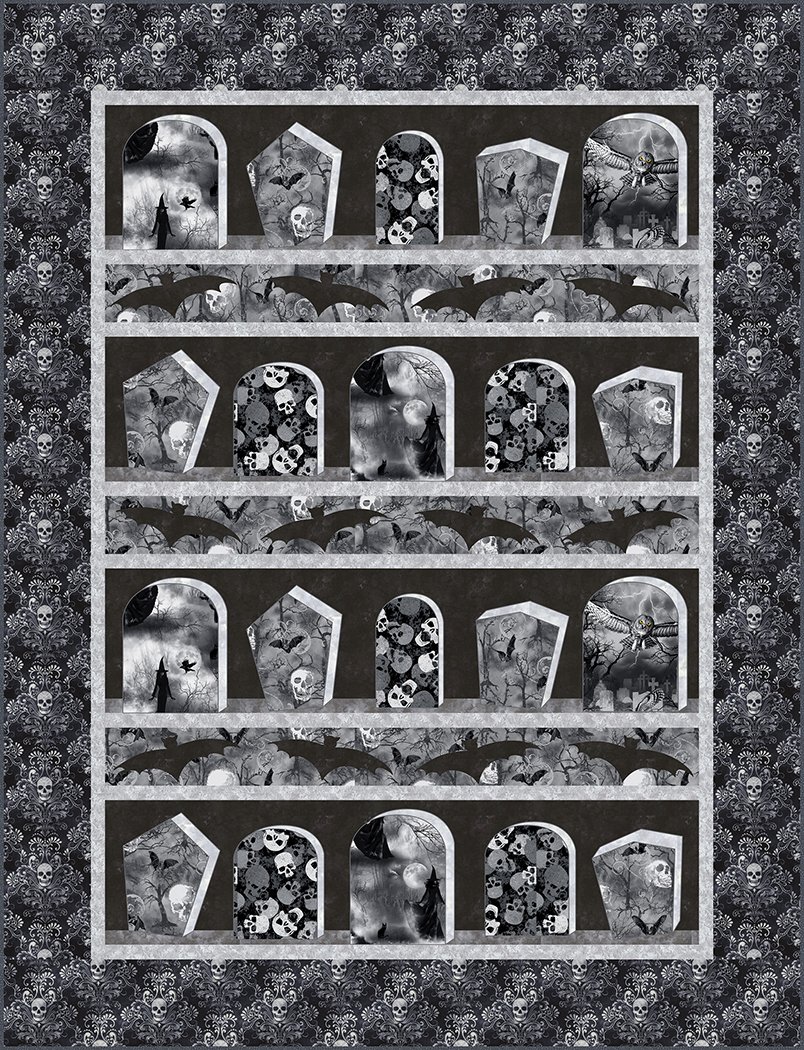
Spooky Night: Here is a pattern to make a really spooooky quilt for Halloween! It's a great way to showcase any scary Halloween prints that might be too cool to cut!
Link to purchase pattern
Fabric Collection: Wicked Fog from Timeless Treasures
Size: 55" x 72"
Skill Level: Advanced Beginner

Notes: Pieced pattern with fusible appliqué elements. An appliqué pressing sheet is helpful with assembly. Pattern includes full-size reversed templates.


Welcome to Booooville & Gnarly and the Ghosts: Let's wrap up this trunk show with Welcome to Booooville. This is a really fun project featuring the Halloween fabric line Booooville, designed by our very own Matthew Pridemore. Supplies are limited so make sure to stock up on this adorable Halloween line before it's all gone.

Link to purchase pattern 

Link to  Booooville Fabrics by Matthew Pridemore


Booooville Fabric Collection: Booooville from Benartex Fabric
Welcome to Booooville Size: 58" x 62"
Welcome to Booooville Skill Level: Advanced Beginner
Welcome to Booooville Notes: Pieced Pattern


We also have some Booooville Fat Quarter Bundles that include a free pattern!

Link to purchase Booooville Fat Quarter Bundle


 Wrapping-up our Trunk Show:

Follow our Blog and leave a comment at the bottom of the blog post letting us know what your favorite holiday is for a chance to Win a FREE copy of our Fright Night Pattern! What a treat! Winners will be advised via email if they win.

Not included in this trunk show is our Block Mania Blog Hop FREE block, which is also Halloween themed! Come download this free block pattern for Batty and Happy and be sure to watch the video tutorial on Youtube.

Saturday, September 19, 2020

Quilting and Sewing for Beginners


These past months have been a time when many have chosen to take up new hobbies or spend more time focusing on things that bring them joy. For us, we have devoted the time to designing new quilt patterns, making video tutorials and working on other fun craft projects to share with you. 

Are you, or is someone you know, interested in learning more about quilting? We know well just how scary it can be to get started. There are so many terms, techniques and tools used and it can be hard to keep everything straight. I can recall jumping in headfirst when I first learned how to quilt - and I made quite a mess of things (a long story for another time). 

However the good news is that it lead me to our local quilt shop to ask for help. The owner took one look at my creative attempt at a quilt and immediately recommended I enroll in a beginner class to learn the basics. Since finishing that course, I have designed and developed thousands of quilts throughout the fabric industry and never looked back.

After gaining such experience, I decided that I want to share with you my best advice for beginners in a new video series on YouTube "Learn How to Make a Quilt". This series is FREE to everyone since I believe a good understanding of the basics helps to make the quilting experience better and more fun. Hopefully it will encourage you to keep learning and growing, and want to advance on to some of our other, more intricate projects.

So make sure to subscribe to our YouTube channel, The Whimsical Workshop and follow along with all videos in this series to get you started in this great craft. And if any of your friends are also ready to take the plunge and learn quilting ,or just want to brush up on the basics, make sure to let them know as well. The more the merrier!  


You will need to have a basic understanding of how to thread and run your sewing machine, but everything else will be covered.

Below is the Beginner Project for this course, Simply Rails:


To get us started, I have designed a quilt that is small and approachable. For this project, we'll be focusing on technique more than the overall design. Let's first get you comfortable with making the various components before worrying too much about the visual components. The size of this quilt makes it perfect for use as a table topper, wall hanging or even a baby quilt. It will all depend on the fabrics you choose to use. (Don't worry, we will cover how to pick the right fabric).


Here is the schedule for the YouTube Series (Feel free to save this image to your computer so you can keep track if need be!):


We've also compiled several of our classic beginner patterns for when you're finished with the series and ready to tackle a project on your own! Quick reminder too that for any of our patterns, we're available via phone or email to help walk you through any questions or concerns - don't be shy about reaching out! 


Saturday, September 12, 2020

How to make a simple Pencil Cup Organizer! Fast and Easy


Hi there and welcome back! Today I want to highlight our newest YouTube video tutorial “Free Quick and Easy Sewing project for Back to School-Pencil Cup Organizer”. 
This video is the first in a series of simple sewing projects that will help you improve your sewing skills. Each video tutorial should be easy enough to follow along, that there's no need to purchase a pattern.

Since we are beginning this series off in September, I wanted to start with how to make a Pencil Cup Organizer. I made one of these a few years ago while at quilt camp with some of my dear quilting friends. At the time, I wasn't sure if I would use it, but thought it could be fun to make anyway. Now years later I can tell you that this little organizer has sat by my sewing machine holding all of my goodies ever since I brought it home.  


It's the perfect size for your sewing room or for holding miscellaneous household items, and makes a great gift for your favorite student or teacher. They're so quick to make that you can easily make more than one. 


For this project you will need three different fabrics:  


Red Gears from Matthew's Mini Monsters by Matthew Pridemore

Pipes and Monsters from Matthew's Mini Monsters by Matthew Pridemore

Black Gears from Matthew's Mini Monsters by Matthew Pridemore


Supplies you'll need:

Fat ¼ for the body of the organizer (Red Gears print in example)

Fat 1/8 for the Pockets (Pipes and Monsters print used in example)

¼ yard for the binding for the Binding (Black Gears print used in example)

You will also need (1) piece of batting that's the same size as the body of the organizer, and (4) 3/8” x 8” ribbons for the ties.


This video covers everything from cutting to basic quilting with a walking foot, pressing and pinning and adding on a binding using the Binding Ruler. Let's get into it!

To start, let's start with how to measure the cup you plan on using, in order to figure out what size to cut your pieces. 


In our example shown above, the cup was 4 ½” high x 12” around the widest part, so the cutting for our project was as follows:

(2) 9” x 12” pieces for the Body & Batting

(1) 6” x 12” piece for the pockets

(1) 2 ½” x 60” strip for the binding (we show you how to piece this in the video)


Once you are cut and ready to go, we will walk through basic quilting with a walking foot:


How to press and pin the pockets in place to create box pleats (easy peasy, I promise!).  


And Finally how to put a binding on completely by machine as well as how to use our Binding Ruler. This method is the same method I use on all of our quilts so it is a handy technique to know)


Need a Binding Tool of your own? You can get one here, on our website: https://www.thewhimsicalworkshop.com/shop/c/p/Binding-Tool-for-212-Binding-with-Binding-by-Machine-Instructions-x12686132.htm


I hope you've enjoyed this simple sewing project and have learned lots of new sewing skills. We would love to see your cup organizers and what you put in them! 

Let us know in the comments if there other simple projects you would like to see me make and share with you in future videos and stay tuned for more virtual trunk shows, free projects, sewing tips and tricks, and more! 


Thanks for following along.

Tuesday, September 1, 2020

Batty and Happy FREE Block for Halloween!


It's time for another Block Mania Blog Hop free block! If you aren't familiar with the Block Mania Blog Hop, every month a group of the quilting industry's top designers each create a free 12" block that all fit within the same theme and color palette. All blocks are posted on the first Tuesday of the month and you get to hop from blog to blog, learning more about each designer and collecting your free patterns. 

This month's spooooky theme is Halloween! I created this block called Batty and Happy, and it's available FREE on our website here: Batty and Happy.

We are also offering a SVG File for sale to cut the applique shapes on a fabric cutters such as the Cricut Maker. Here is the link to purchase this

Batty and Happy

This month, I wanted to take you behind the scenes on how I select fabric for my projects. Here is the video showing just how I chose the fabrics for this block.


Here are the final fabrics I ultimately decided on. They are a combination of fabrics from Benartex and Windham basics.


Recently I've been using my Free Block design to test out new ways of using my Cricut Maker. It's led to some pretty interesting discoveries and useful tips on how to more easily cut fabric for applique with the Cricut. I've documented some of these tips in a series of YouTube videos that you can watch here


Once we have all of our fabric pieces cut and ready to assemble, it's to move to the iron!


Here's a shot of our adorable bat coming to life. I am using an Appli-fuse mat to make easy work of this. Did you know we now have these available on our website and have a video on how to use them here


Now that we have our block assembled, it's time to pick our favorite Aurifil threads for the finishing stitch. This month I got up close and personal in a video on how to finish the edges of the applique ,as well as my trick for using a machine stitch that looks like embroidery for the stitch around the bat's mouth.


 And finally, here is our adorable Bat out collecting treats! Happy Halloween!


I hope you have enjoyed this month’s free block. Make sure to visit our website, www.thewhimsicalworkshop.com for more whimsical patterns and our YouTube channel for more quilting tutorials.


Here are the links to my fellow designers on this Blog Hop. Have Fun!

https://prettypiney.com/which-hat

http://www.inquiringquilter.com/questions/2020/9/1/quilt-block-mania-september-is-halloween

https://alwaysexpectmoore.com/2020/09/free-pumpkins-quilt-block.htmlhref="https://poweredbyquilting.com/2020/09/01/quiltblockmania-halloween/

https://sewbrainy.com/blogs/news/three-treats-block

http://www.sliceofpiquilts.com/2020/09/going-batty.html

https://www.duckcreekmountainquilting.com/blog/2020/9/1/halloween-and-day-of-the-dead-quilt-blocks

https://orangeblossomquilt.com/blog/f/elphaba-thorpes-big-fat-gypsy-wagon

https://www.seamstobesew.com/?p=25307

https://www.quilted-diary.com/post/september-quilt-block-mania

https://www.perkinsdrygoods-blog.com/quilt-block-mania-september/

https://blockofthemo.com/freebies/

https://www.offthewallquilt.com/blogs/news/as-fall-approaches

https://quiltmoments.com/quilt-block-mania-september

https://aroundthebobbin.com/quilt-block-mania-halloween

https://heidipridemore.blogspot.com/2020/09/batty-and-happy-free-block-for-halloween.html

https://www.quiltfabrication.com/2020/09/halloween-candy-corn.html

https://cottonstreetcommons.com/a-gathering-place-for-creativity/quilt-block-mania-dark-night/

https://sewonthego.blogspot.com/2020/09/Turninguppumpkins.html

https://scrapdash.com/?p=8296

https://stashbandit.net/quilt-block-mania-and-giveaway/

https://pattispatchwork-blog.com/2020/09/01/30-free-spook-tacular-blocks/

https://www.amararcreacions.com/en/quilt-block-mania-halloween/

https://auntemsquilts.com/tutorials/free-halloween-quilt-blocks

https://www.appliquesquiltsandmore.com/blog/quilt-block-mania-halloween-171384

https://lp.constantcontactpages.com/su/iJSf6SU/QBMSeptembe

https://bluebearquilts.com/2020/09/quilt-block-mania-sun-boo-net-sue-block-free-pattern/

https://ohkayequilting.com/2020/09/01/make-a-hairy-leg-spider-block/

https://utahquiltappraiser.blogspot.com/2020/09/quilt-block-mania-halloween-blocks.html