Saturday, February 20, 2021

How to Make this Stunning Silver Jubilation Quilt

Welcome back to our blog! Today I'm going to walk you through how to do the Square in Square blocks made from bias triangles and the mitered borders that make up our beautiful Jubilation quilt pattern. These are great techniques to take with you when making other projects as well so I made a full video tutorial for YouTube that you can come back to and re-watch at any time. 

For this project, I chose to start with the Silver Jubilee fabric collection from Maywood Studios. It's a really elegant collection of pretty blues, white and silver that celebrates Maywood Studio's 25th anniversary.  

The block is built out with little square in a square units made with flip and sew, and diamond shapes. Because we've covered flip and sew before, this post is going to focus mainly on the bias triangles and diamond shapes. 


You can use the templates included in the Jubilation pattern or use Creative Grids 2-Peaks-in-1 Ruler to make the Diamond blocks. 


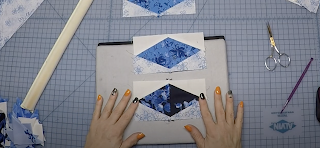
The diamond shapes are made up of two triangle in a square units. To create the diamond, sew two mirror image triangle units together end to end. Press the seam open; I recommend using a strip stick and purple thang for ease. 

You'll notice the diamond points are 1/4" away from the edge, and that's how they should be! You'll need four of these units per block, and our pattern calls for two different color ways, one color for the center block and the second for the surrounding blocks. 

Now, let's move on to the center of the block which is made using bias triangles. The center is a square, which I fold in half in both directions and give it a good press. I fold each bias triangle in half to mark the center line as well. This gives us our center lines that we can use during assembly.

The first round is white triangles. I take the first white triangle and nest it into the center square, following that folded line to center the bias triangle on the square. Next, do the same thing for the opposite side and sew with 1/4" seam. Then, in order to not stretch the fabric, gently fold up the white triangles and press down using the edge of the iron into the seam. Next we can add on the remaining two white triangles using the center square's folded line for alignment. Press the triangles and square up the unit. 

Next, we'll add on the remaining triangles and square up the finished unit. Then we can assemble the block using all three units that we've made!


To piece the half triangle blocks, start with a half of the center unit from the above step as directed in the pattern. The block is sewn in rows, so we'll start with a small triangle, diamond and square in a square for row one. Then sew a second diamond unit to the half center unit for row two. Sew rows one and two together, and finish with another small triangle at the top. 

Following the pattern, match up the finished setting triangles with the main blocks to assemble the quilt top. 


Once the two inner borders are on, let's start on the outer border, which will have the mitered corners. To figure out how much fabric you need, take the overall size of the quilt and add 4" to give yourself a little excess to work with. 


To sew the outer border, begin by centering it on your quilt and pin it in place. Then flip the project over and sew with the border on the bottom and the quilt top on top. This makes it easier to start and stop 1/4" away from each corner. Sew all 4 sides on, but don't press anything at this point. 

Fold your quilt top in half diagonally, wrong sides together, so that the borders lay flat. Mark the miter on the outer border fabric using a ruler with a 45 degree line, and sew from end to end. If your border lays flat with no pleat, then you're ready to trim away the excess, leaving 1/4" seam allowance. Repeat for the other 3 corners, and you're all set!


I hope you enjoyed following along for this project and that you feel empowered to take on square in a square blocks, diamond units and mitered borders! Are there any other techniques you'd like a tutorial on? Let me know in the comments!

Thursday, February 11, 2021

Free Project for Valentine's Day


February is widely known as the Month of Love thanks to its most popular holiday, Valentine’s Day. While for some Valentine’s Day may feel like an over-the-top Hallmark holiday, I personally love the idea of everyone collectively coming together on the same day to celebrate the people in their lives that they love. Whether you’re bringing roses home to your partner after a long day of work, dropping off homemade brownies to your best friend, or watching a romantic comedy on the couch with your family, Valentine’s Day gets its true magic from the traditions that you and your loved ones create. 


One way that I show love to my friends and family is by creating sweet, thoughtful (and usually easy) projects to let them know that I was thinking of them. This is a free project I designed for exactly this purpose – quick, sweet and easy! It’s the perfect size for a wall hanging or table topper, and while I like that it’s not in traditional Valentine’s Day colors, yours easily could be! For the version I’m showing here, I chose the Curious Dream collection from Windham Fabrics. It’s soft, pretty and inspired by one of my favorite fairy tales, Alice in Wonderland. 


Dearest Heart
36" x 36"


This project features the use of the GO Mix and Match 6” Qube, GO! 6” Companion Set and Queen of Hearts Die Sets, however traditional cutting instructions are included in the pattern instructions. You can download this free pattern from our website: https://media.rainpos.com/4806/dearest_heart_pattern_with_cover_fr064_01182017.pdf


While constructing the pieced block for this quilt, I wanted to keep things simple. I used a Monkey’s Wrench Block, featuring assorted dies from the GO! Qube 6” Mix and Match dies. I added a touch of white fabric as the restring strip to help break up the different peach and teal pieces. 


For the appliqué block, I used a combination of colors and different heart sizes from the Queen of Hearts Die to add dimension. I centered the layout easily by folding the background square into quarters and pressing. Then, once you open the block, the center lines are pressed in and can be used as a placement guide for the hearts. 


I choose a bright turquoise Aurifil thread for the finishing stitches around the hearts as I like the way that the color pops off against the block. Even though thread color can sometimes look very intense on the spool, I recommend laying out a piece of thread you’re considering against the block to see how it looks. You’d be surprised at how much your opinion can change when you see everything together. I tried several softer colored threads initially, but kept coming back to the bright turquoise!


To pull everything together, I used the darkest teal fabric in the collection as the sashing as it works as a frame around each of the lighter colored blocks. I also used the peach words fabric for the corner stones to help bring the peach color through to the outer areas. 


Now if you know me, you know just how much I love polka dots! So for the Outer Border I made (44) 3” Drunkard Path blocks and used them to create a polka dot border. I’m absolutely thrilled with how this came out and feel like it has the potential to bring such an interesting element to other borders and projects. Also Make sure to check out our video on how to do curves without pinning 


If you decide to make this pattern for a loved one in your life, I hope you have as much fun making it as I had! Happy Valentine’s Day and don’t forget to share any pictures with me – seeing your creations is my favorite part!


Tuesday, February 2, 2021

Hi My Name is Lucky Block Mania Blog Hop


It’s now month seven of the Block Mania Blog Hop! I can’t thank you enough for following along and coming back for this next free block! Have you made any of our previous blocks yet? If so, please send us a picture at Heidi@thewhimsicalworkshop.com or share it with us in the comments below. I would love to see what you’ve created! 

If this is your first time stopping by for a free block, welcome; we’re so glad you’re here! All 6 of our previous block patterns and SVG files are available on our website, www.thewhimsicalworkshop.com. So make sure to collect them all! 

The theme for this month’s block is “Lucky Charms”, with a corresponding color palette of bright pastels. I used this direction to bring to life, Lucky, a cute and colorful unicorn that’s here to bring more luck into your life. He’s sitting on his lucky clover patch at the end of a rainbow, just waiting to brighten up your day. Here are the links to the pattern and SVG files for Lucky.

I hope you’ve been having as much fun meeting these characters, as I’ve had in creating them. Comment below with your favorite so far, or if there’s an animal you’re still hoping we’ll create for an upcoming block. 
Now let’s get started crafting our newest pal, Lucky!


I like creating video tutorials to accompany these free block patterns because sewing and quilting is such a visual activity. It can be really helpful to see the block come together while you’re following along with pattern instructions. I tend to focus mostly on how to assemble the various pieces into the final block, but if you’re interested in seeing how I create the original concept in my sketchbook, let me know! 

To see how I assemble this block, be sure to watch the video to learn more about the block and finished design while I put everything together.


This month’s block features an assortment of basics from our friends at

Benartex Fabrics. You’ll need a mix of pastels, solid black and solid white

to make this block. 


You’ll also need to make a gentle curved bottom for the block. If this is a new technique for you, don’t be discouraged! I’ve already got a quick YouTube video tutorial ready for you.


Next, it’s time to pull out your appli-fuse sheet and placement drawing so we can start assembling Lucky. I always recommend building out these complex shapes in sections, starting with the smallest first. For example with Lucky, that would mean starting with the eyes and nose, or the tail. Once all your sections are together, we can then put them together to build out the full unicorn.


Once the main body is assembled, we can add in the additional details like the smile and horn accents. Maker Tip: I recommend adding these to the unicorn before pressing him to the background!
Using the placement drawing on the bottom, add the unicorn on top and you should be able to see the lines through the fabric. Take a fabric pencil and mark the lines.


Next, let's build the rainbow! Refer to the quilt photo and start with your yellow fabric, slightly overlapping each shape as you work up. Do not press the bottom of the rainbow pieces down yet!

Once all the rainbow pieces are together, trim the bottom of the pieces to match the curved seam. Now press the ends to the background.

Now let’s finish up the block by adding the Unicorn and Clovers to the background.


Now that we have our block assembled, it’s time to pick out your favorite Aurifil threads for the finishing stitch and move to the sewing machine. As always, I am using Aurifil Cotton threads. If you're as obsessed with Auriful threads as I am, be sure to check out my video on YouTube where I organize my hundreds of spools. It makes for such a beautiful visual when I'm all done!


If you need a quick reminder on how to finish the edges and machine embroider on the details, visit our Present for Penny video:

And there you go, now you've got a finished unicorn block!


I hope you have enjoyed this month’s free block. Make sure to visit all the other designers on the Blog hop to collect your free Luck Charms blocks!

Each month a group of top designers in the quilting industry will each create a FREE 12” block that fits the month’s theme and color palette. We will all post our blocks on the first Tuesday of the Month. You can hop from blog to blog to learn more about each designer and collect your free block pattern. This month’s theme is “Lucky Charms” and I created our adorable "Hi My Name is Lucky" block for you. The pattern is available on our website. The Block Mania Blocks will only be available free of charge for the first two months afterwards they will be for sale for $5.00 as a digital download.


Lucky Horseshoe by Carolina Moore
Lucky Squares at Slice of Pi Quilts
Lucky Spin by Carolyn Burgess
Charming Wreath Block by Blockofthemodotcom
Lucky Squares Improv at Love to Color My World
Luck and Sunshine
Luck o' the Irish at Patti's Patchwork
Simply Charmed by Cotton Street Commons
Hi My Name is Lucky by Heidi Pridemore
Swedish lucky horse by duck creek mountain quilting
Charmed Clover at Perkins Dry Goods
Charming Lucky by Puppy Girl Designs
Star Bright at Studio R Quilts
Lucky Charms by QuiltFabrication
Magically "Quilt"lious
Wishing Stars
Heart Shine 4th by Sara Flynn
Lucky Shamrock Block
Lucky Gnome
Feelin' Lucky by Inquiring Quilter
Pastel Clover at Blue Bear Quilts
Daddy Hex by Pretty Piney Quilts
Pieced Lucky Hat
Sam's Pot of Gold
Love and Luck by PhoebeMoon Designs
Maneki Neko by Capaquilts
The Butterfly Charm