Saturday, November 14, 2020

We are Teaching at Road to California Road at Home Event in January!


As we move further towards the end of 2020, I’m getting really excited about the upcoming Road to California in January. While Road to California is always a great event, I think it’s going to be even better this year because, drumroll please….. I’m teaching several classes!


This time the event is going to look a little different as it will be held virtually. Road to California is now Road at Home for this year. Though we would have loved to see you in person, there are some perks to gathering virtually. Not only will you save money on travel and hotel costs, but that leaves you with more money for all the fun stuff! You also won’t need to pack up and travel with your studio, or worry about forgetting anything. You’ll get to work comfortably from your own creative space.

And finally, classes will be recorded and posted online so that you can access them over and over as needed. You’ll get to go at your own pace and don’t have to worry about missing a step or moving through a technique too quickly. You will also get to contact me directly with any questions, concerns or just to share your creations with me. I’m so excited to hear from you! 


Whether you’ve been attending Road to California for years or if this would be your first time, I really hope you’ll join me on this adventure. I’ve been planning some really fun activities and can’t wait to share them with you.
Hope on over to https://online.roadtocalifornia.com to check out more about the classes and events. I’ve listed out the classes I’ll be teaching below. 


And if you can’t attend Road at Home, be sure to subscribe to our blog so we can keep you updated on other fun projects. And if you join our email list by visiting the homepage of our website, you’ll get notified as we add classes to our own schedule, separate from Road to California. 


Classes and Lectures:

We will be teaching the following classes:


Little Succulent Garden Pillows
Wednesday January 20th 8:00-4:30pm pst


Rippling Waves Quilt
Saturday January 23rd 8:00-4:30pm pst


The Many Ways to make HST, QST, Cats Cradle Flying Geese and More Lecture

Friday January 22nd 8:00am-9:30am pst


I hope you to see you in one of these upcoming classes! Please leave me comment below and let me know what your thoughts are on virtual teaching and Zoom Classes. 

Tuesday, November 3, 2020

Check out Our Free Block for Block Mania Blog Hop A Present from Penny


We're back with another great block for the Block Mania Blog Hop! If you're new to this Blog Hop, each month a group of top designers in the quilting industry create a free 12” block. Everyone uses the same theme and color palette, and posts their patterns on the first Tuesday of the month. You then get to hop from blog to blog, learning more about each designer and collecting an assortment of free block patterns. 


This month's theme is "Winter Celebration" and I'm excited to share our new block with you: A Present from Penny. The pattern is available here


Our September and October blocks, “Batty and Happy” and “We Are Family", are still available as free downloads for the entire month of November 2020. Our Block Mania Blog Hops blocks are available as free downloads for their debut for two months. Afterwards, they're listed for sale at $5.00 each for a digital download. So be sure to download your free pattern today!


To accompany this free block, I've also created a video tutorial for you. It covers how to mark, cut and sew an organic curved background, perfect for appliqué blocks, as well as how to embellish the tree. Organic curve piecing is easy to do and so forgiving. If you have not done this technique before, never fear, I walk you through it in the video   


To start, let's cut and sew our curved background so that our adorable penguin has a place to stand. Just pin the two pieces together, draw a curvy line, cut and sew. And there you go - now you have a curved background!  


Once all of our pieces cut and ready for assembly, we can set up our appliqué pressing sheet and placement drawing to put our pieces together. Personally, I like to cut my pieces using an SVG File with my Cricut Maker. If you also have a Cricut and want the convenience of being able to use it to cut out your pieces, you can purchase our SVG file on Etsy or our website. But don't worry if you don't have a Cricut, you can definitely make this block without it!


And now that our block is assembled, let's pick our favorite Aurifil threads for the finishing stitch and move to the sewing machine.


In the video, I've included my favorite trick for using a machine stitch that looks like embroidery to embellish the tree. If you try it out, let me know if you like it!


 I hope you like your present from Penny; she gives it with lots of love!


Christmas Wreath by Slice of Pi Quilts
Baby Sue's First Christmas
Celebrate by Inquiring Quilter
Gifts at Always Expect Moore
Snowflakes by Blockofthemodotcom
Gifts of Friendship
Fireworks at duck creek mountain quilting
Wreath & Chain at Stash Bandit
Christmas Star by Michelle Renee Hiatt
Adirondack Mountain Quilt Block
A Present from Penny
Candlelighting at Pretty Piney Quilts
Poinsettia from QuiltFabrication
Harbor Holidays at Blue Bear Quilts
Christmas Cracker at Perkins Dry Goods
Sparkling Spruce at Patti's Patchwork
Jingle All the Way at Orange Blossom Quilt
Snowflakes & Candy Cane Trees at Quilt Moments
Tower of Gifts by Oh Kaye Quilting
Winter Memories by Carolyn Burgess
Holiday Block by Seams to Be Sew
Ticker Tape Tree at Devoted Quilter
Evergreen by True Blue Quilts
Merry and Bright at Around the Bobbin
Ski Vacation

Saturday, October 31, 2020

Happy Halloween! Sneak Peek at the Making of the Fright Night Quilt

Happy Halloween everyone! Is this anyone else’s favorite holiday, or just mine? I love getting to be a little silly, dress-up as something fun and eat lots and lots of candy. Basically Halloween is a day where we all get to be kids again. No gifts to buy, no stress or messy kitchen, just plain old silly fun!


To celebrate, I wanted to give you some insight into how we made our newest Halloween quilt, Fright Night. This spooky pattern features the Wicked collection from our friends at Northcott. 


When this line of fabric came first across my desk, I was immediately inspired to make a fun throw quilt. But I knew that the prints would also lend themselves really well to wall decor or a door quilt. Instead of just settling for one, I figured why not make a pattern for all three!


The video quilt tutorial we made to accompany this project covers how to make the lap quilt, which encompasses all the techniques you'll need for assembling the smaller projects. 


To get us started, let's take a close-up look at the main panel which helped inspire all three of these fun projects. So spooky! 


In the video tutorial I cover some tips on how to work with panels and how we added a border around the panels in these projects to help make sure they were the correct size for the quilt center. 


Next up, we show you our favorite method for making Flying Geese. With this tip, they come out perfect!  You can check out the ruler I use in the video here.


There are a lot of points and seams in this project... To help, I cover how to press seams open in a way that helps the blocks lay flat when finished. I use one of our favorite tools, The Strip Stick to make pressing seams open a snap!


And here's a fun peek at the block center before we added on the last pieced borders.


Next up, it's time to add the last border onto the pieced blocks.


Here are the pieced and small panel blocks finished and ready for assembly. After this, we just need to finish the center block.


To finish the Center Block, we need to add a pieced border to the top and bottom of the large panel block.


And look at that, now we finally have all of our blocks ready for assembly!


 Time to finish up the quilt top and get this quilted!


Here is the finished quilt back made by Monica Croom who quilted it with Halloween motifs! It is spooky, cute and ready for me to cuddle under it tonight for Halloween.


I hope you've enjoyed the walk through for this project as much as we enjoyed designing and making it! Be sure to check out this video tutorial along with all of our other great videos on our YouTube channel. While your there make sure to subscribe and hit the bell to be notified every time we post a new video.

Happy Halloween!


Saturday, October 24, 2020

BIG NEWS! The Whimsical Workshop is now on Spoonflower!

Hello there! We are incredibly excited to share with you some big news: Some of our favorite fabric designs are now available on Spoonflower! Today, let's go over what these designs look like. We're working on some really fun projects to go with these fabrics so stay tuned!

All of the designs can be seen and purchased from our Spoonflower profile here: https://www.spoonflower.com/en/shop?on=fabric&q=Matthew%20Pridemore&availability=ForSale&sort=bestSelling


Tossed Dragons Pink and Teal | Sweetie Collection

Matthew designed this adorable pink dragon named “Candy the Sweetacular”. She loves candy, all things sweet, and also has a little bit of an attitude! Remind you of anyone?

Tossed Dragons Pink and Teal features our fun pink dragons that measure 1-1/4" x 1 3/4". Part of the Don't Call Me Sweetie Collection.


Donut and Candy Paisley Pink & Teal

Here is another design from Matthew, who has always loved both paisley prints and donuts (how could you not?). In this print he combined these two loves of his into a sweet delight

A bright and whimsical pink and teal paisley with some mini donuts & hard candies thrown in for fun. Each paisley measures 2" x 4".


Donut Stripe - Pink and Multi

Speaking of donuts, in my opinion, you can never have enough. So here is our adorable Donut Stripe. This print is perfect on its own or as a border, and pairs really well with both Sweet Paisley (shown above) and some of other prints shown below! A fun and whimsical stripe featuring various delicious donuts.  1" Pink stripe with 1-3/4" multi colored donuts 


Milk Chocolate Bar | Sweetie Collection

Who doesn’t love chocolate? I'm not sure I trust anyone who doesn't like chocolate... Here is our Sweetie Chocolate Squares print ready for all Chocoholics! The best part is there are no calories in this Chocolate Bar. The Chocolate Tiles each measure 1" x 1".


Whimsical Patchwork 5" Cheater, Whole cloth squares. Multi-Colored

Personally, this may be one of my favorite prints (ssh don't tell the others!). Each patch is a 5” Patchwork squares, so one piece of fabric can be used just like a charm pack! All of these whimsical and happy prints can be used in border or cut apart, and are perfect for small appliqué. What a versatile print, right? This  5" Whimsical Patchwork can also be used as a Whole Cloth or Cheater Quilt.


Wrapped Candies

This is the perfect coordinate for several of the fabric prints we've already shown you! These tonal tossed candies are available in three colors: Bright Blue, Hot Pink and Bright Yellow. Which is your favorite? Tossed Candies Blue Tonal,  Tossed Candies Pink Tonal or Tossed Candies Yellow Tonal . Each Candy measures 3/4" x 1".


Steampunk Gears

And now finally we have the perfect print for all steampunk fans, Coplayers, makers and so many more! The copper gears are large scale and perfect as a quilt border or for pillows, totes and garments. Gear measurements Large, 3-3/4" and Small 2". 


It's been so much fun designing these prints and making them available for you! Spoonflower has a large assortment of materials that these designs can be printed on, including cotton, rayon, organic, woven, upholstery and knit fabrics. It can even be printed as wallpaper! All of these prints will be up on our website in the next few months, but you can get them now without the wait!


If you use any of these prints in your projects, we'd love to see what you make! You can share pictures and videos with us on Facebook, Instagram, or even email them to us at heidi@thewhimsicalworkshop.com.


Saturday, October 17, 2020

Let's Celebrate Fall with a Virtual Quilt Show!

We are SO excited that is finally Fall! Fall brings brisk days, colorful trees and sweater weather, not to mention classic Turkey day and my all-time favorite, pumpkin pie! Who doesn't love pumpkin pie?! 


For this week I thought I could share with you some of my favorite Fall themed quilts that we've worked on over the years! Hope you enjoy the show! 


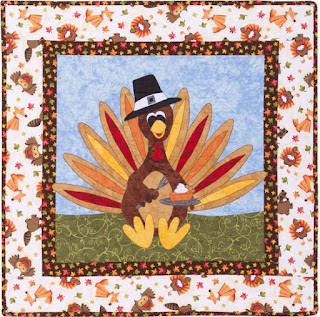
Here's the first beautiful quilt in our show: Skip to Dessert. This is hands down the most popular Thanksgiving pattern available on our website. This friendly guy just wants to point out how important the Dessert Food group is! Maybe we should just start with dessert before every meal!


You can get the pattern here: https://www.thewhimsicalworkshop.com/shop/c/p/Skip-to-Dessert-Pattern-x10324177.htm


Next up is the elegant and easy to make Autumn Splendor quilt that's made up of flying geese and HST Units. The beautiful fabrics used in the quilt shown below are from the Radiant Paisley collection from Benartex Fabrics. It's in stores now so make sure to pick some up!


You can get the pattern here: https://www.thewhimsicalworkshop.com/shop/c/p/Autumn-Splendor---Digital-Download-Pattern-x44712512.htm


This beautiful quilt, Chocolate Covered Cherries, features the Ruby fabric collection designed by the talented Bonnie Sullivan for Maywood Studios. We have a great video tutorial that helps walk you through this pattern step by step.  


You can get the pattern here: https://www.thewhimsicalworkshop.com/shop/c/p/Chocolate-Covered-Cherries---Digital-Download-Pattern-x44762057.htm

And watch the video tutorial here: 


I designed Pine Tree Lodge several years ago in honor of my hometown of Rochester, New York. Fall in Upstate New York is a such a sight to see! I haven't had the chance in years to be home during this beautiful season since we are always getting ready for Quilt Market, but my goal is to be there next year! This quilt image features Autumn Palette from Timeless Treasures.


You can get the pattern here: https://www.thewhimsicalworkshop.com/shop/c/p/Pine-Tree-Lodge---Digital-Download-Pattern-x38719648.htm


Looking for a quick and easy Fall themed project? Our Happy Fall quilt is built around a center panel from the Hello Beautiful Fall fabric line from Timeless Treasures. Both the panel and fabrics are in stores now! If you're looking for tips on assembling a panel quilt, be sure to visit us on YouTube where we go over our favorite insider tips and tricks. 


You can get the pattern here: https://www.thewhimsicalworkshop.com/shop/c/p/Happy-Fall---Digital-Download-Pattern-x44571606.htm


Next up in our show today is The Midas Touch: This quilt looks way more complex than it actually is to make, I promise! I did a three-part tutorial on this project to go along with our pattern and it takes you through every single step. All three videos are free on YouTube. Don't forge to subscribe and leave a comment to let us know what you think! The quilt features Radiance from Benartex Fabrics. If you want to learn more about this project, we shared a whole blog post dedicated to it that you can check out here


You can get the pattern here: https://www.thewhimsicalworkshop.com/shop/c/p/The-Midas-Touch---Digital-Download-Pattern-x44762120.htm


And you can watch the 3 part video tutorial here: 


If you're looking for a quilt that features a beautiful Fall color palette, but isn't fully comprised of leaves, Marble Mania may be exactly what you're looking for! This pieced curve quilt is a snap to assemble, just check out our YouTube Video on how easy it is to do curves with my special glue trick! This quilt features Metallic Marble basics and Stardust Basics from Michael Miller Fabrics.


You can get the pattern here: https://www.thewhimsicalworkshop.com/shop/c/p/Marble-Mania---Digital-Download-Pattern-x44578162.htm

Want to learn more about our easy trick for sewing curves? Check it out here: 


And finally, the last quilt in this showcase, The Lady’s Garden. Did you know that our studio was lucky enough to design many of the quilts that Andover Fabrics used to promote their Downton Abbey Fabric lines from a few years ago? It was quite the honor as we were huge fans of the show. This was the quilt I designed inspired by Cora Crawley, the Countess of Grantham. I also designed several others that I will share more in upcoming episodes of our Story Behind the Quilt Series on YouTube. 


You can get the pattern here: https://www.thewhimsicalworkshop.com/shop/c/p/The-Ladys-Garden-Pattern-x16366397.htm


I hope you've enjoyed our Fall quilt preview! Make sure to also check out our FREE Block Mania block, We Are Family,  featuring some new adorable character and friends.